Tiger bread
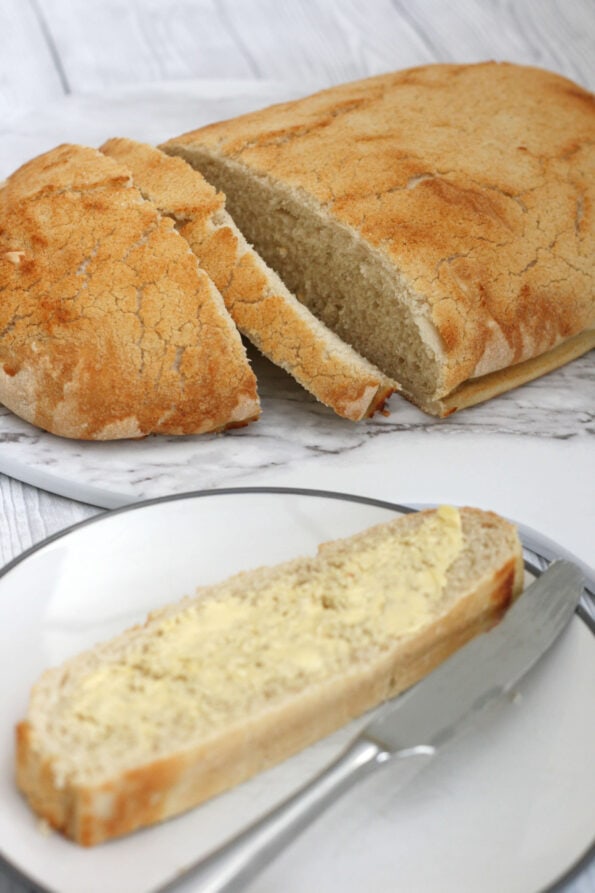
Tiger bread is a delicious white and fluffy loaf with a distinctive, crispy, mottled crust. Also known as giraffe bread, this recipe is a family favourite.
Tiger bread (or giraffe bread), is one of our favourite loaves. My kids love the white fluffy bread as well as the delicious crispy, crackled topping.
Tiger bread tends to be the loaf we buy from the shops if it’s available, but I had no idea how to make one from scratch with the distinctive mottled topping. It turns out it’s really simple and totally worth the extra effort if you usually just make a plain white loaf.
How to you make the tiger bread topping?
It’s really easy, you just add a rice flour paste, flavoured with a little sesame oil, to the top of your favourite white loaf before you bake it. The paste dries and cracks as it is baked in the oven which gives the bread its distinctive pattern.
The rice paste crust also gives the loaf a delicious flavour, as well as keeping the loaf crispy on top but lovely and fluffy on the inside.
Can you add Marmite to the Tiger bread crust?
Some recipes for tiger bread add ½ tsp of Marmite or Vegemite to the rice paste. The Marmite would add a nice colour to the topping and an extra richness to the flavour. I’m not a Marmite lover though so didn’t want to buy a jar just to use ½ tsp so we left it out. If you love Marmite, why not try adding some and see what you think.
How can kids help make tiger bread
Like most bread recipes, this tiger loaf is surprisingly easy to bake, making it perfect for children.
Start getting your kids to measure and mix the bread ingredients together. Then you ca let your kids get their hands messy while they knead the dough.
To save a bit of time, you can let a mixer with a dough hook attached, do a lot of the hard work for you, but my kids always like their turn of kneading the dough themselves at the end.
My kids also liked mixing up the rice paste and then spreading it on before watching it brown and crackle in the oven.
What other easy bread recipes for kids are there?
If your kids enjoyed making this tiger loaf they might also some of our other easy bread recipes for kids including:
Finger rolls
Easy white bread recipe
Soda bread
Homemade bagels
Hedgehog rolls
English muffins
Brown bread
Homemade garlic focaccia
Useful equipment
You might need the following baking tools/gadgets to make this tiger bread:
Digital scales
Freestanding mixer
Mixing bowl
Wooden spoons
Measuring cups
Measuring spoons
Baking tray
Palette knife
Wire rack
As an Amazon Associate I earn from qualifying purchases.. You will not be charged anything extra for this. Please refer to my Privacy Policy Page for more details.
Ingredients
500g (4 cups) strong white bread flour
7g sachet fast action yeast
1 ½ tsp caster sugar
1 tsp salt
300-350ml (1 ¼ – 1 ½ cups) warm water
For the topping
90g rice flour
½ 7g packet of fast action yeast
½ tsp golden caster sugar
½ tsp toasted sesame oil
90ml warm water
How to make tiger bread
Make the bread dough
Get your kids to measure out the flour and add it to a large mxing bowl or freestanding mixer.
Pour in the packet of yeast into one side of your bowl.
Add the caster sugar and salt to the other side of the bowl. When your kids are measuring these out, make sure they level the top of each spoon with their finger to make sure they get the right amount.
Measure the water – you want it to be warm, not hot or cold. It should feel nice if you put your finger in it.
Slowly pour in the first 300ml (1 ¼ cup) of water, mixing it in with the dough hook of your freestanding mixer or just wooden spoons or a spatula if youre using a mixing bowl.
Mix it until it comes together in a dough. If it’s too dry and there is still flour at the bottom of your bowl, add a little more water. You shouldn’t need any more than an extra 50ml (350ml in total).
Knead your dough for 5-10 minutes. You can do this in your free-standing mixer with the dough hook attached. We normally, do this at the start to let the mixer do the hard work for us, then finish the kneading by hand.
If you don’t have a mixer, get your kids to do it by hand. Get them to pull and stretch and bash the dough for around 10 minutes until it is smooth and elastic and not too sticky.

Pop your dough in an oiled bowl and cover it with a tea towel or oiled cling film.
Leave it to prove somewhere warm for an hour until it has doubled in size.
Form the loaf
Take your dough out of the bowl and ‘knock it back’. That basically just means you get your kids to punch it a few times to get the air bubbles out of it.
Shape the dough into a large sasuage shape and tuck the ends under to form your loaf.
Put your tiger bread onto a baking tray with a sheet of baking/parchment paper on it to stop it sticking.
Cover your tiger loaf with oiled cling film again and leave it somewhere warm for around 45 minutes, or until it has double in size again.
Don’t leave it for too long or it can get too big and then end up losing its shape.
Bake the tiger bread
Preheat your oven to 200C / 180C Fan / 390F.
Add the crusty topping mixture
Make up the topping mixture in a small bowl. Get your kids to mix all the topping ingredients together until you have a spreadable paste.
Remove the cling film from your dough, then spread the topping mixture all over it. We used a small palette knife but if you don’t have one, you could use a butter knife of the back of a spoon.
Bake your tiger load for 35-40 minutes. It’s ready when it has turned a nice golden brown colour, the topping has crackled and if you turn it over and tap it underneath it should sound hollow.
Serve and enjoy.

Tiger bread
Equipment
- Digital scales
- Freestanding mixer
- Mixing bowl
- Wooden spoons
- Measuring cups
- measuring spoons
- baking tray
- Palette knife
- Wire rack
Ingredients
- 500 g (4 cups) strong white bread flour
- 7 g sachet fast action yeast
- 1 ½ tsp caster sugar
- 1 tsp salt
- 300-350 ml (1 ¼ – 1 ½) cups warm water
For the topping
- 90 g (½ cup) rice flour
- ½ 7 g packet of fast action yeast
- ½ tsp golden caster sugar
- ½ tsp toasted sesame oil
- 90 ml (⅓ cup) warm water
Instructions
Make the tiger bread dough
- Measure out the flour and add it to a large mxing bowl or freestanding mixer.
- Pour in the packet of yeast into one side of your bowl. Add the caster sugar and salt to the other side of the bowl.
- Measure the water – you want it to be warm, not hot or cold. Slowly pour in the first 300ml (1 ¼ cup) of water, mixing it in with the dough hook of your freestanding mixer or just wooden spoons or a spatula if youre using a mixing bowl.
- Mix it until it comes together in a dough. If it's too dry and there is still flour at the bottom of your bowl, add a little more water. You shouldn't need any more than an extra 50ml (350ml in total).
- Knead your dough for 5-10 minutes until it is smooth and elastic and not too sticky.
- Pop your dough in an oiled bowl and cover it with a tea towel or oiled cling film. Leave it to prove somewhere warm for an hour until it has doubled in size.
Form the tiger bread
- Take your dough out of the bowl and 'knock it back'. Shape the dough into a large sasuage shape and tuck the ends under to form your loaf.
- Put your tiger bread onto a baking tray with a sheet of baking/parchment paper on it to stop it sticking. Cover your tiger loaf with oiled cling film again and leave it somewhere warm for around 45 minutes, or until it has double in size again.
Bake the tiger bread
- Preheat your oven to 200C / 180C Fan / 390F.
- Mix up the topping mixture in a small bowl then spread the topping mixture all over the tiger bread loaf.
- Bake your tiger load for 35-40 minutes. It's ready when it has turned a nice golden brown colour, the topping has crackled and if you turn it over and tap it underneath it should sound hollow.
Pin for later
Similar recipes:
If you liked this tiger bread recipe, you’ll love our other easy bread recipes, including:
Finger rolls
Easy white bread recipe
Soda bread
Homemade bagels


Tiger bread tastes lovely but the loaf spread on the 2nd prove and so it’s fairly large and flat…. Any tips on how to stop it spreading ? Many thanks [email protected]
I’ve found if I make this on a particularly warm day the 2nd prove can make the loaf rise quite a lot. To stop it getting too big you can cut the 2nd prove a little short.